


In this tutorial, we will learn how to install and configure the OpenVPN access server on Ubuntu 20.04. You can also use this tutorial for CentOS. To learn how to configure the OpenVPN client to connect to the OpenVPN server, just follow our OpenVPN client tutorial for macOS, Windows, and Ubuntu.
VPN (Virtual Private Network) allows us to establish a protected network connection when using public networks. VPN hides our original IP address by network redirect through a specially configured remote server run by a VPN host.
OpenVPN is an open-source package, anyone can use it without any charges. OpenVPN is fast and one of the most popular VPN applications. It used both types of transmission protocols, UDP and TCP. VPN tunnels are most secured with OpenVPN protocols with the help of SSL/TLS authentication. Credentials, certificates, and MAC addresses are locked inside the multifactor authentication.
It accepts incoming VPN connections and OpenVPN client can initiate a connection to the server.
Configuring the OpenVPN server manually is a very tough task. So, in this tutorial, we will use an OpenVPN installer script to set up the OpenVPN server.
Prerequisites:
- Server with Ubuntu 20.04 operating system.
- Root user or Other user with sudo privileges.
Step 1: Installation of basic packages
- Update the server’s repository
apt update -y
- Find the server’s public IP address. To find the server’s public IP address, run the following command.
For Ubuntu
Install the Wget packages.
sudo apt install wget -y
To check the public IP address with wget command.
wget -qO - icanhazip.com
Install dig command
sudo apt install dnsutils -y
To check the public IP address with the dig command.
dig +short myip.opendns.com @resolver1.opendns.com
For CentOS
Install the Wget packages.
yum install wget -y
To check the public IP address with wget command.
wget -qO - icanhazip.com
Install dig command
sudo yum install bind-utils -y
To check the public IP address with the dig command.
dig +short myip.opendns.com @resolver1.opendns.com
With the help of these two commands, you can easily find the server’s public IP address.

For Ubuntu
- Install the curl package.
apt install curl -y
For CentOS
yum install curl -y
Step 2: Installation of OpenVPN on Ubuntu
- Download the installation script with the help of curl command.
curl -O https://raw.githubusercontent.com/angristan/openvpn-install/master/openvpn-install.sh
- Grant the execution permission to the script.
chmod +x openvpn-install.sh
- Run the downloaded script.
sudo bash openvpn-install.sh
- Confirm the Server’s Public IP address.
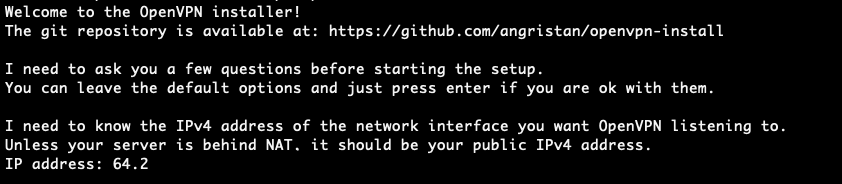
Check your server’s public IP address, if the server’s Public IP is incorrect, then delete the existing IP and add the correct IP address.
- Type
nand Press theEnterkey.
- Press
3and Press theEnterkey.

Note down the Random port generated by the above command. In my case, the Random port is 51216.
- Type
1and Press theEnterkey.

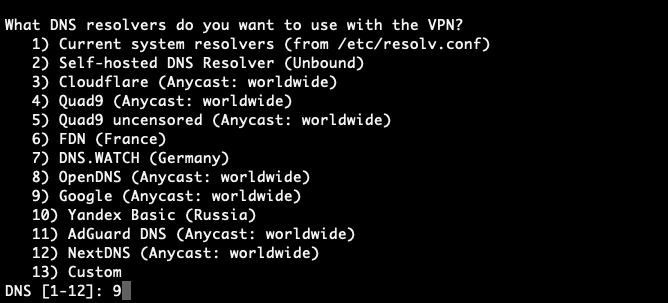
- Press
9and Press theEnterkey.
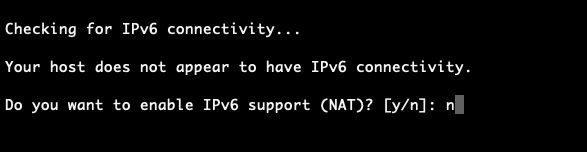
- Type
nand Press theEnterkey.

- Now type
nand Press theEnterkey.

- Press any key to start the setup process. Now the script will automatically download the required packages and automatically configure the OpenVPN server.

- Set a name for the client.

- Enter
1and PressEnterkey to set up a password for the client

- Set a password for the client.

- The OpenVPN client is successfully added on the OpenVPN server. In my case the OpenVPN client file is saved at
/root/Linuxpanda.ovpn.

- Confirm the OpenVPN services active and running, use the following command to check the OpenVPN is running. Also, make sure the OpenVPN daemon is listening on the port which was instructed by the script.
sudo ss -tupln | grep openvpn

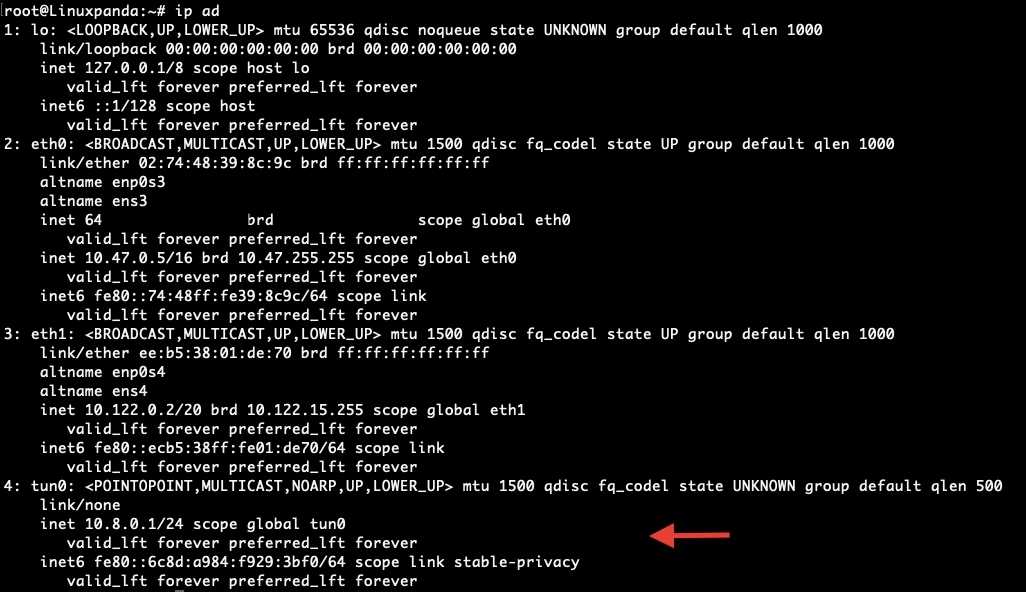
- If you check your network interface, a new interface is added by the OpenVPN for the VPN tunnel.
Conclusion
In this tutorial, we have learned how to install and configure the OpenVPN on Ubuntu 20.04. You can follow the same tutorial for the Ubuntu 21.10/18.04 operating system.
You can also learn how to configure the OpenVPN client and connect to the OpenVPN server, just follow our OpenVPN client tutorial for macOS, Windows, and Ubuntu.
If you guys have any queries related to this tutorial, then let me know in the comment section.