


In this tutorial, we will learn how to Install Webuzo Control Panel operating system.
Introduction
Webuzo Panel is a user-friendly panel, It does not require any special type of knowledge for working on it. it offers a variety of features such as Host new Domain, Create and manage database, Access PhpMyAdmin, Create and manage the FTP, etc.
it is also a Single User Control Panel based on the LAMP STACK. We can easily install the Webuzo Panel on any Linux-based dedicated server, Virtual Server or deploy it in the form of Virtual Appliances. Webuzo contains a list of 419 scripts and the list of 1115 Classes of Softaculous and still keeps on updating the existing and introducing the new Scripts and Classes.
Webuzo can be installed as a Virtual Appliance on Linux, Mac, and Windows and used in any environment like home, office environment, etc. We can easily implement the Webuzo on Parallels Desktop, VMware, VirtualBox, etc. With the help of Virtual Appliance, we can easily run the application in isolation mode by installing the application in the System’s operating system.
We can also use Virtual Appliance for MySQL development, Wiki, JAVA, etc.
Requirements for Install Webuzo Control Panel
- Webuzo supports Linux Operating System based on x86_64. it can only be installed on a fresh Server. Webuzo supports CentOS 6 / 7, Ubuntu LTS Operating systems.
- RAM required 1 GB (For better performance use 2 GB RAM).
- Disk Space required 5 GB (For better performance 10 GB is recommended).
- These Ports are must be open on the server – 2002, 2003, 2004, 2005, 21, 22, 25, 53, 80, 143, 443, 465, 993 and 3306.
- If you have installed Apache, MySQL and PHP then remove them.
Initial Setup for Webuzo
Before starting the installation process, we have to update the server so that the latest packages can be installed. Also, install some other required package.
- To update the server run the following command.
yum update -y
- Install EPEL (Extra Packages for Enterprise Linux) repository on your CentOS server. This repository will help to download the other required packages.
yum install epel-release -y
- Install the required package to download the installation script.
yum install wget -y
- The Installation Process will take time, so run the script in Screen.
yum install screen -y
- Install the Vim editor, To edit the files.
yum install vim -y
Set the Hostname
In most cases when a server is created at that time hostname is not set, due to this installation, scripts show an error that your Hostname is not Fully Qualified.
- To check the hostname, run the following command.
hostname
- To set the Fully Qualified Hostname, run the below command.
hostnamectl set-hostname server.example.com
Replace server.example.com with your desired hostname. In the above command, I am using server.example.com as hostname, you can also create the hostname in the same way with your domain name.
Create Swap File
Swap is a space on a disk that is used when the amount of memory in RAM is full. When the RAM runs out of space at that time all the inactive tasks moved from RAM to the Swap space. Normally the amount of Swap files is double of
To create the Swap file run the following commands.
- First check the RAM of the server and also check the swap file is already exist, To check the RAM run the following command.
free -h
- After Checking the RAM, allocate the space for the Swap File. Swap file must be the double in size of RAM. For example server have 2 GB RAM so, I have created 4 GB of swap file.
sudo dd if=/dev/zero of=/swapfile count=4096 bs=1M
Change the count value as per your requirement. If you want to create the Swap file of 2 GB, simply write 2048 in the count section. Write the count value in MB.
- Change the ownership of the Swap file to Root User.
sudo chown root:root /swapfile
- Change the permission of the Swap file so that only Root User can access and modify the file.
sudo chmod 0600 /swapfile
- Run the command to set up the file as Linux swap area.
sudo mkswap /swapfile
- Enable the swap file which we have created.
sudo swapon /swapfile
- Check the Swap File successfully created or not.
sudo swapon -s
- To make the Swap file permanent, simply edit the
/etc/fstabfile.
vim /etc/fstab
- Add the following content in the
/etc/fstabfile.
/swapfile swap swap defaults 0 0
Fstabfile plays an important role in booting the server. If Fstab file is not properly configured then it may cause serious damage to the server. To check the configuration offstabfile run the following command.
mount -a
- To check the Swap is active, either run the
Freecommand or use theswaponcommand as shown below.
free -h
sudo swapon --show
- Adjust the Swappiness value, first check the existing value.
cat /proc/sys/vm/swappiness
- For the production server we have to need to set the lower value.
sudo sysctl vm.swappiness=10
- Make the Swappiness value permanent edit the
/etc/sysctl.conffile.
vim /etc/sysctl.conf
- Add the following content in the file.
vm.swappiness=10
Install Webuzo
Webuzo installation script offers different types of installation as per the requirement of the user. Choose the installation process as per your needs.
Install the LAMP Stack, DNS Server and FTP server along with Webuzo
To install the Webuzo, first, we need to download the installation script.
- To download the installation script run the following command.
wget -N http://files.webuzo.com/install.sh
- Modify the permission of the script which you have downloaded earlier.
chmod 0755 install.sh
- Run the installation script.
./install.sh
Install the LAMP Stack(softname → lamp) and DNS Server (softname →bind>) along with Webuzo
In this installation process, we can customize the installation script to install specific packages with softname.
- To download the installation script run the following command.
wget -N http://files.webuzo.com/install.sh
- Modify the permission of the script which you have downloaded earlier.
chmod 0755 install.sh
- Run the installation script.
./install.sh --install=lamp,bind
Install only Webuzo without any LAMP Stack
- To download the installation script run the following command.
wget -N http://files.webuzo.com/install.sh
- Modify the permission of the script which you have downloaded earlier.
chmod 0755 install.sh
- Run the installation script.
./install.sh --install=none
Setup the Webuzo
After the successful installation, we need to setup the Webuzo with the help of the browser.
- To setup the Webuzo, simply enter the following in the URL section of the browser.
http://server_ip_address:2004
- Now you will see the
Webuzo Initial Setupas mentioned in the following picture. Enter the details as per your requirement.
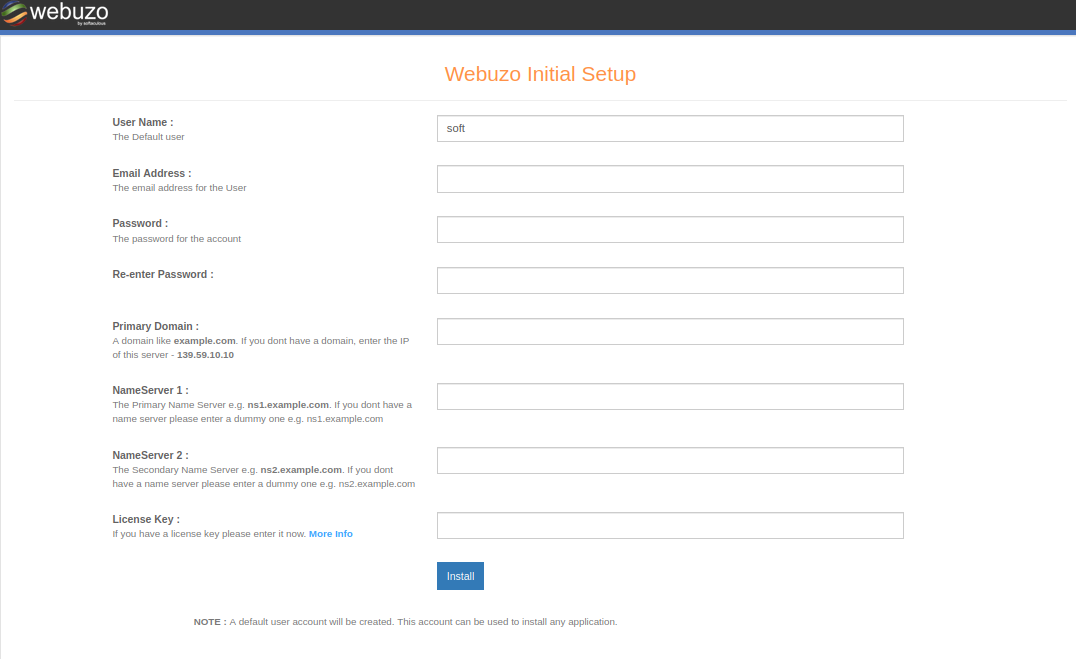
User Name – Create a new User Name for the Webuzo Panel.
Email Address – Enter the Email Address to get the update from the Webuzo Panel.
Password – Set a new strong password for the Webuzo Panel.
Re-enter Password – Again enter the password which you have entered in the above box.
Primary Domain – Enter the details related to the domain, if you don’t have any domain then simply enter example.com.
NameServer 1 – Enter the detail of the first Nameserver, if you don’t have any domain then enter the first Nameserver as ns1.example.com
NameServer 2 – Enter the detail of the second Nameserver, if you don’t have any domain then enter the first Nameserver as ns2.example.com.
License Key – Enter the details of the license key, if you don’t have the license then simply skip.
- Click on the
Installbutton and wait to complete the installation process. After the successful installation you will see the following picture.
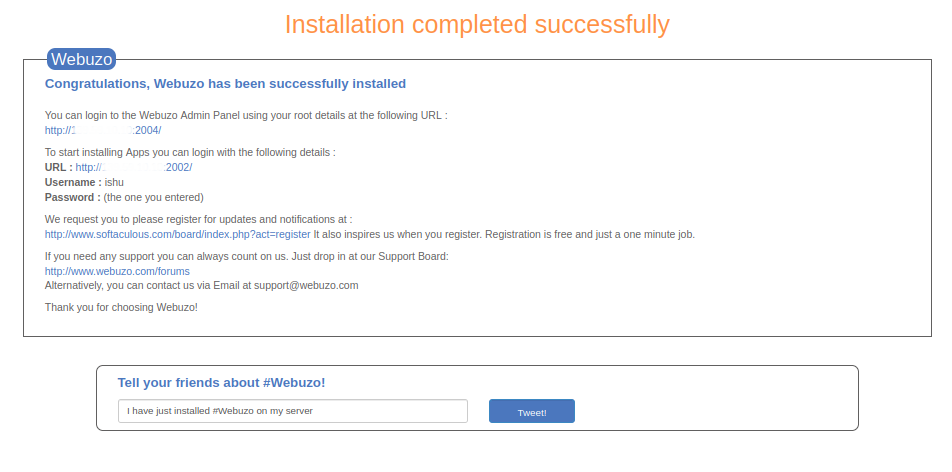
- Webuzo is not divided into two parts Admin Panel And End User Panel. To login the Webuzo Admin Panel, run the following command.
http://server_ip_address:2004
Enter the Username and Password which you have created earlier.
- To Enter the End User Panel simply run the following command.
http://server_ip_address:2002
Add Domain In Webuzo
Webuzo Panel is a user-friendly panel and does not require any special type of knowledge for working on it. it offers a variety of features one of the features is Add Domain. Install Webuzo Control Panel
- To host the new Domain simply click on the
Add Domain.
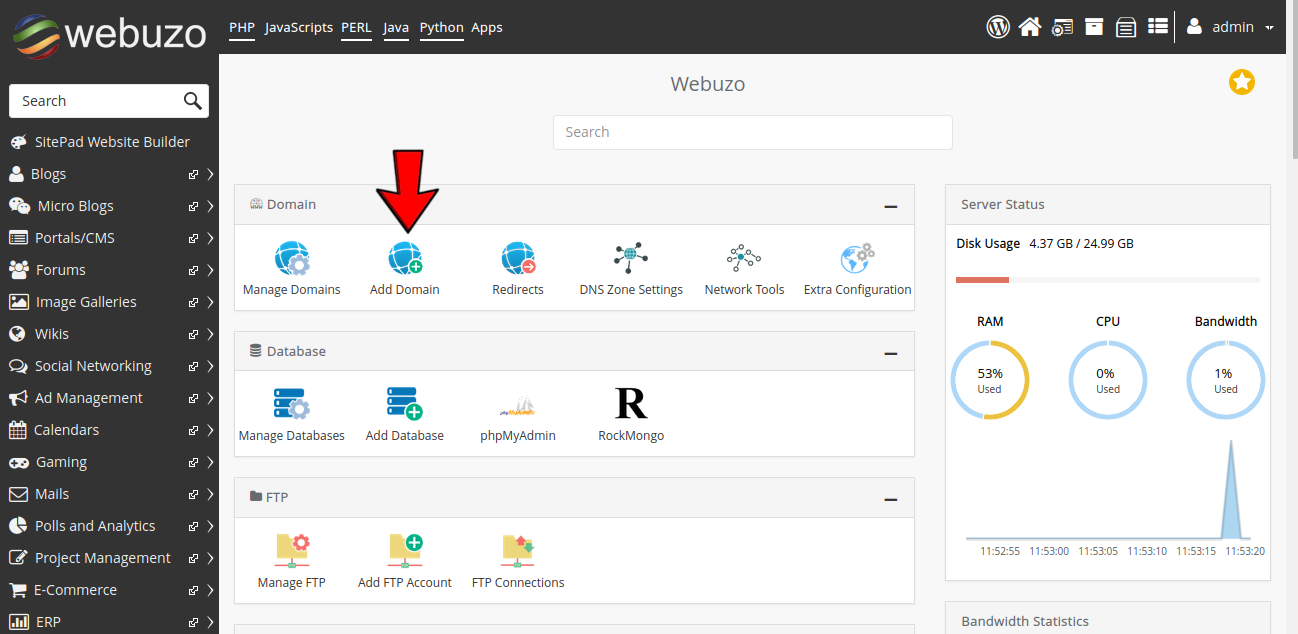
- Enter the Details of the Domain which you want to host on Webuzo panel.
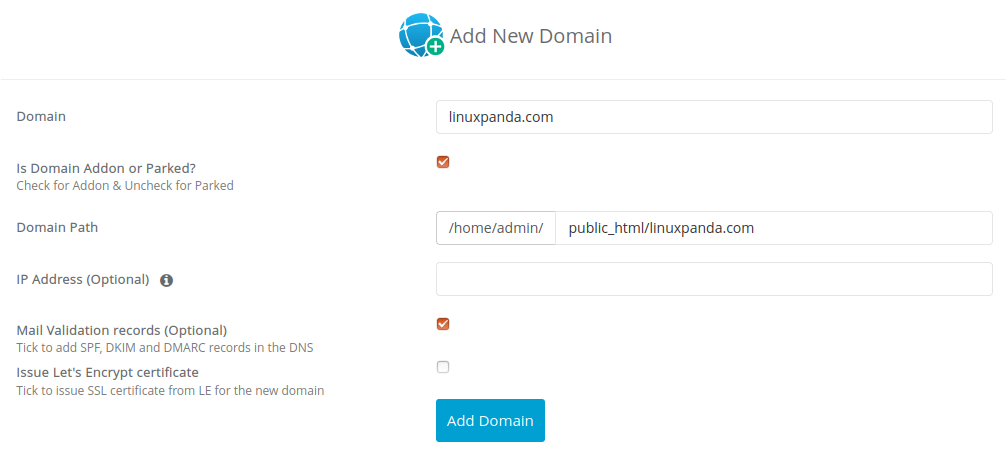
Domain – Enter the domain name which you want to host on the panel.Is Domain Add or Parked? – If you untick this option then the panel will treat it as a parked domain, Panel will not create Domain Path and other configurations for the Domain.Domain Path – It will create the Document root of the Domain where all the Domain related files will be stored.IP Address (optional) – It is used to assign a Special IP address for the Domain.Mail Validation Records (Optional) – This option will create all the required records for the Mail service.Issue Let's Encrypt certificate – This option is used to implement the SSL on the website, but it only works when the DNS Records of the Domain are pointing on the same server.
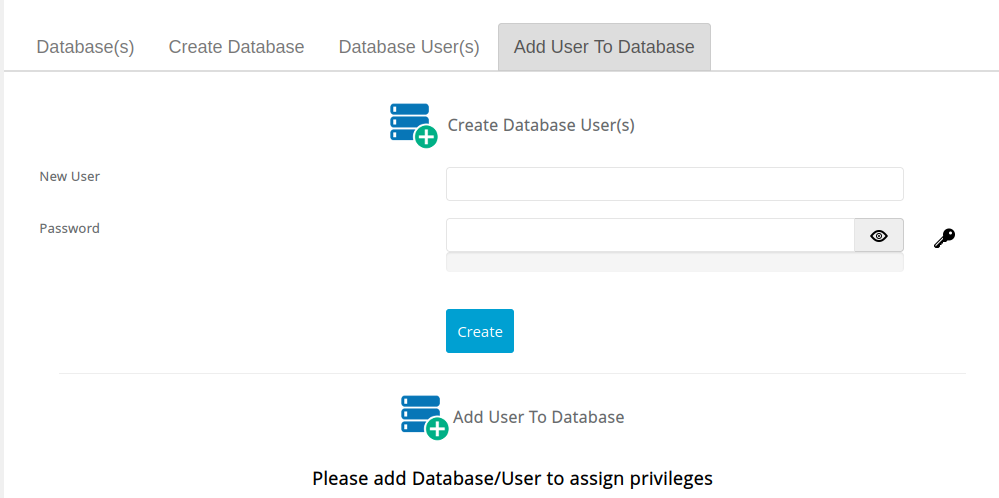
Create and Manage the Database
Creating and managing the database is a very easy task in Webuzo.
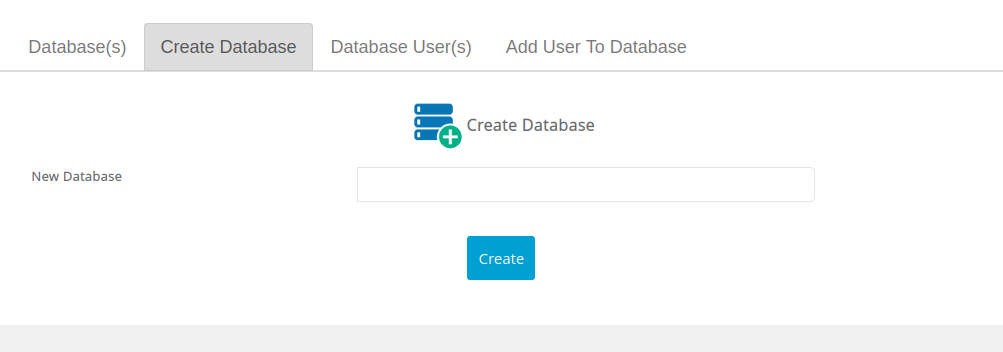
- To create the database simply click on the
Add Database.
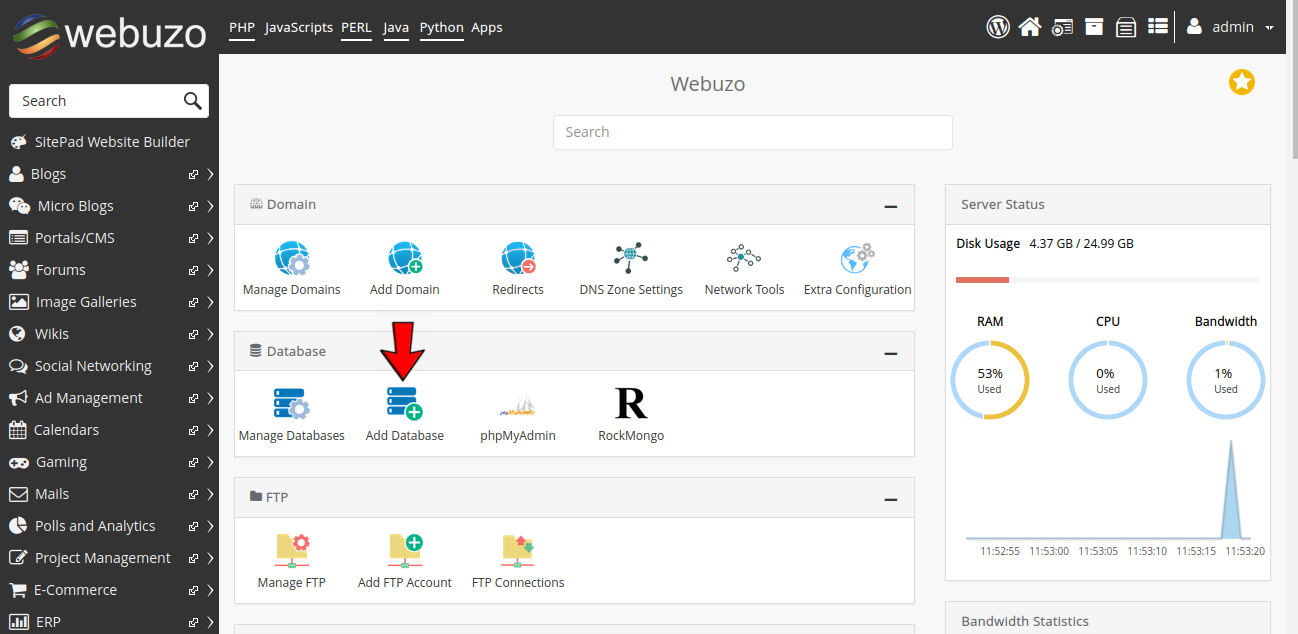
- Enter the Name of the database which you want to create.
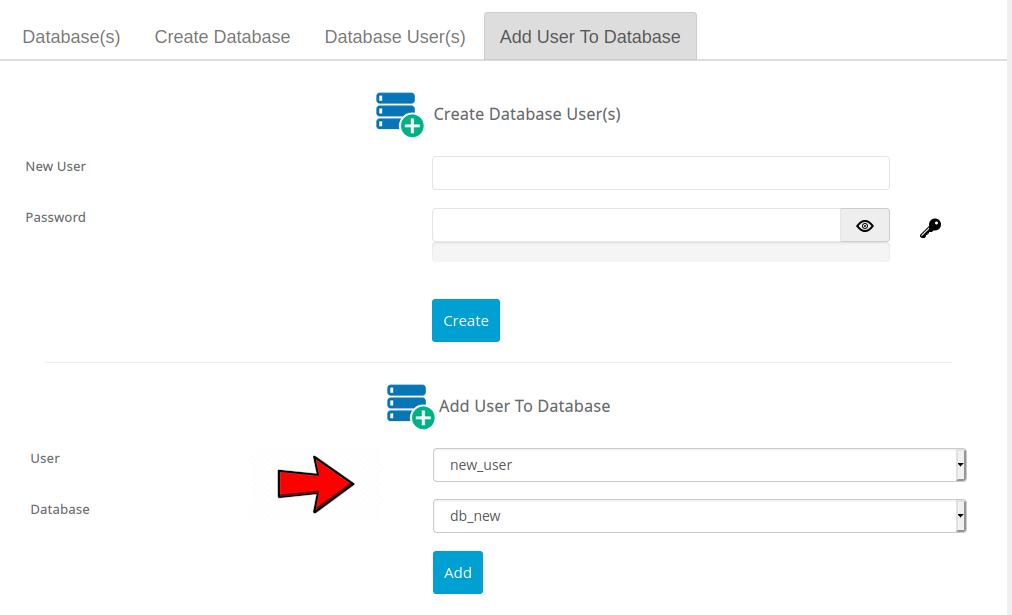
- To create a user for database simply click on
Add User To Database. Enter the name of User.
- Grant privileges to the user on the database, so that the user can modify the database. Scroll down and select the User and Database Name and then Click on
Add.
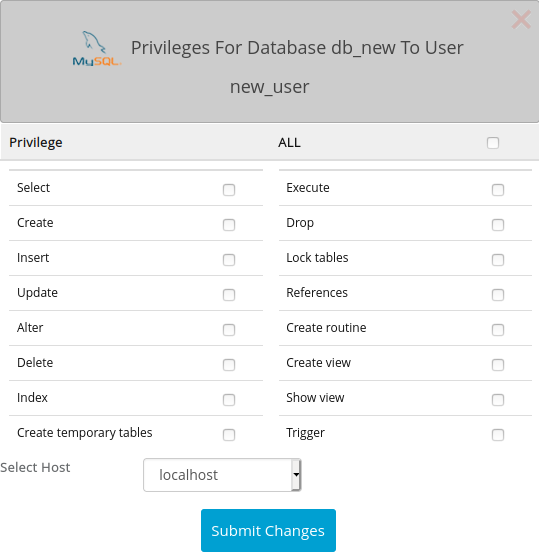
- Click on
Allto allow all the privileges, if you want to grant some specific privilege then you can select the privileges as per your requirement. Click onSubmit Changes.
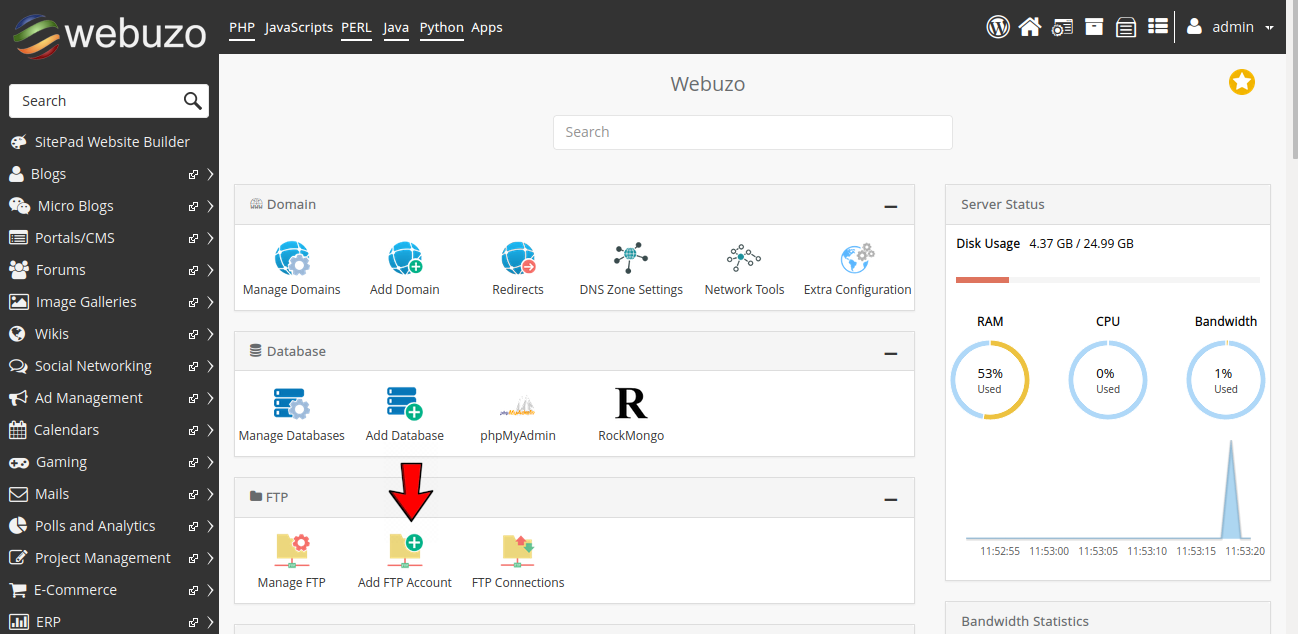
Create FTP Account
Ftp is mostly used by web developers. The FTP is used to transfer the files and database from the local system to the server.
- To create the FTP account, click on the
Add FTP Account.
- Create the Username and password for the FTP account.
Login– Enter the Username for the FTP account.Password– Enter the password for the FTP account.Password(again)– Again enter the password for the FTP account.Quota– You can set the limit for the FTP user as per the requirement, or you can set it to unlimited.Directory– The Ftp user can only access the files and directories which are present in this path which you have provided here.
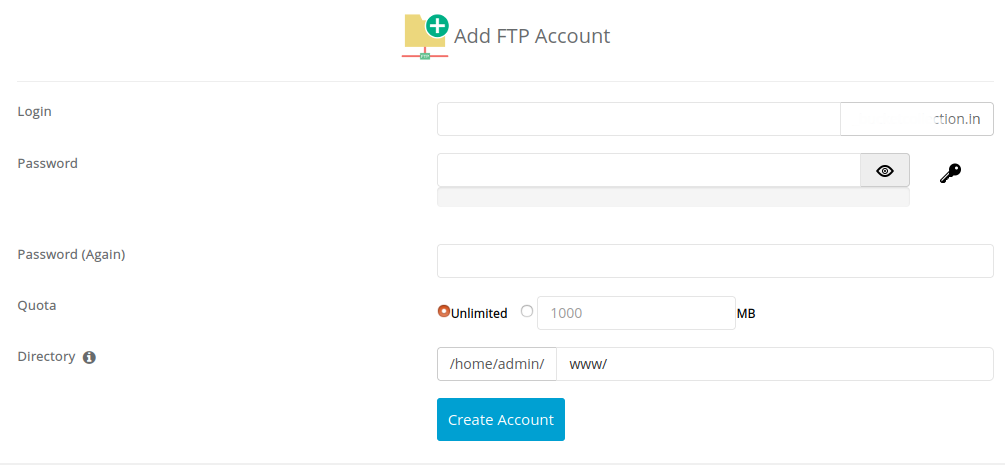
Click on Create Account.
Conclusion
In this Install Webuzo Control Panel tutorial, we have learned how to install the Webuzo Panel and also learned about some features of the Webuzo panel. Webuzo is easy to understand and easy to handle. Webuzo is a user-friendly panel.
If you guys face any difficulties or problems, you can contact us through the comments sections.