


Introduction
Apache is the most popular package that used in Linux. Apache is a web server package and used to serve the web content on the internet and is extremely powerful and flexible. Learn How to Configure Apache Virtual Hosts in CentOS 8.
it breaks down its function into individual units, these units can also be customized and configured independently. Virtual Host is the basic unit that describes the website.
Prerequisites for Configure Apache Virtual Hosts.
- CentOS 8 Operating System.
- Access of Root User or User with sudo privileges.
Install the Apache Package
- Update the server packages
yum update -y
- Install Epel repository
yum install epel-release -y
- Install the Vim Editor. Later we will use it to edit the configuration files.
yum install vim -y
- You need to install the Apache package in order to configure the virtual host for the websites.
sudo yum install httpd -y
- Enable the Apache service so that it can automatically start after a Reboot in CentOS 8.
sudo systemctl enable httpd
- Start the Apache service
sudo systemctl start httpd
Disable SELinux
- Check the SELinux status. If the SELinux is active, then we have to deactivate the SELinux security first.
sestatus
- Disable SELinux security
sudo setenforce 0
Create the Directory Structure
First, create the directory structure in which we hold the website data to serve on the internet for the visitors.
The Default Document Root location is /var/www/. Apache always looks at /var/www/ to find the content of the site. If you want to change the default path of Document Root. Simply edit the main Apache configuration file /etc/httpd/conf/httpd.conf.
Note:- Before making any changes in the configuration file always create a backup of the Apache configuration file. So, you can revert the changes in the future.
To change the Document root edit the configuration file and change the path of Document Root and the Directory of the Document Root.
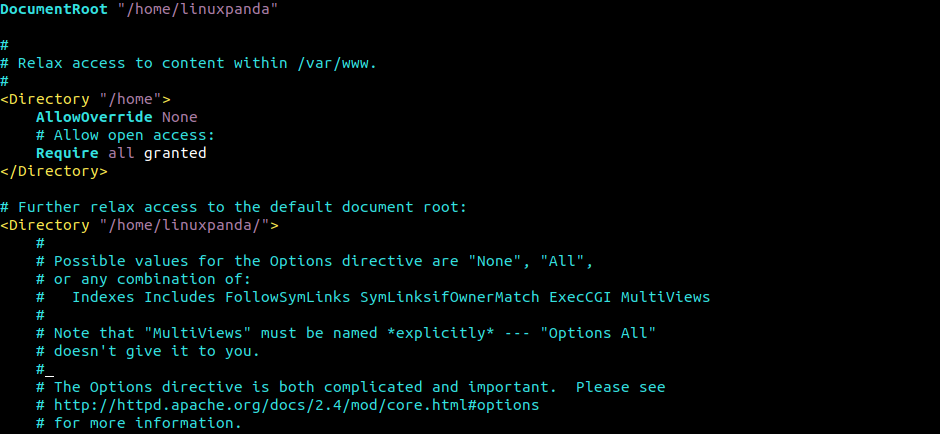
In this tutorial, we will follow the default Configuration File with the default Document Root path. If you change the Document Root path then carefully follow the below steps and then make the changes as per your Document Root.
Create the Directories using the mkdir command with -p extension that allows us to create a folder with a nested folder inside it.
In these directories, we will create the public_html that hold our actual website files. It’s not compulsory to put the files public_html folder.
If you want to host multiple websites then you have to create multiple directories for each of the Domains.
sudo mkdir -p /var/www/linuxpanda.com/public_html
Replace Linuxpanda.com with your domain.
Grant Permissions
All the files and directories are owned by the root user. If you want to allow the other user to access and modify the files in the Document Root then you can change the ownership with the chown command.
sudo chown -R $USER:$USER /var/www/linuxpanda.com/public_html
The $USER variable is used to take the value of the user in which you are currently login in. Now the other user owns the public_html sub-directory.
Now we have to change the permission to ensure that read permission is allowed to the general web directory. So, that all the content inside the public_html can be served properly.
sudo chmod -R 755 /var/www
Create Demo Pages for the Virtual Host
We already created the directory structure, now we have to create the content to serve on the website.
Create a file named as index.html inside the public_html. Always remember that the virtual host only reads from the index.html file, so all the data should be put inside the index.html file. If you create the file with another name then the virtual host (Apache) will not able to see the contents.
- Let’s create the
index.htmlinside the public_html.
vim /var/www/linuxpanda.com/public_html/index.html
- In this file, create a simple HTML document that indicate the site that the page is connected to.
<html>
  <head>
    <title>Welcome to Linuxpanda.com!</title>
  </head>
  <body>
    <h1>Success! The Linuxpanda.com virtual host is working perfectly !</h1>
  </body>
</html>
When done with editing, save and close the file.
Create New Virtual Host Files
Virtual host files are the files that specify the configuration of our website. Virtual host files help the Apache webserver to respond to various domain requests.
We need to set up directories, one for the virtual host files and for another directory that tells Apache that the virtual host is ready to serve the website contents.
- We need to create the two directories
sites-availableandsites-enabled.sites-availabledirectory store all the virtual host files.sites-enabledstores the symbolic link to the virtual hosts.
sudo mkdir /etc/httpd/sites-available
sudo mkdir /etc/httpd/sites-enabled
- Edit the Apache’s configuration file
sudo vim /etc/httpd/conf/httpd.conf
- Add this line to the end of the file. so apache can include the file to read the configuration
IncludeOptional sites-enabled/*.conf
Save and exit the file.
Read Also: How to Setup Key-Based Authentication In SSH
Create the Virtual Host File
For multiple websites, you have to create multiple virtual hosts. You can also host multiple websites from a single virtual host file by adding the data in the same file, but it can increase complexity and can create confusion. So to avoid it create a separate virtual host file for the multiple Domains.
- Create the host file
sudo vim /etc/httpd/sites-available/linuxpanda.com.conf
Note: All the virtual host files must be saved with .conf extension.
- Add the following content in the configuration file. Replace
linuxpanda.comwith your domain name.
<VirtualHost *:80>

    ServerName www.linuxpanda.com
    ServerAlias linuxpanda.com
    DocumentRoot /var/www/linuxpanda.com/public_html
    ErrorLog /var/www/linuxpanda.com/error.log
    CustomLog /var/www/linuxpanda.com/requests.log combined
</VirtualHost>
If you want to create the Sub-Domain just simply add the new data of Sub-Domain in the main Domain’s virtual host file.
Enable the New Virtual Host Files
- After creating the virtual host file, we need to enable it so that Apache knows the website is ready to serve. For this we need to create the symbolic link for each virtual host in the
sites-enableddirectory.
sudo ln -s /etc/httpd/sites-available/linuxpanda.com.conf /etc/httpd/sites-enabled/linuxpanda.com.conf
- Restart the Apache service
sudo systemctl restart httpd
Set Up Local Hosts File (Optional)
If your DNS is not pointing on the same server then you can simply check the functionality of the website by entering the IP and Domain in the /etc/hosts file.
Note – You have to enter these details in the local Linux system host file, not on the server’s host file.
sudo vim /etc/hosts
If you are using a Windows operating system then you can enter the IP address and Domain from here.
127.0.0.1   localhost
127.0.1.1   guest-desktop
Server-Ip-Address linuxpanda.com
Server-Ip-Address www.linuxpanda.com
Now when you search for the Domain then it will forward the request on the IP address which you have mentioned above.
Conclusion
In this Configure Apache Virtual Hosts tutorial, we have learned how to install the Apache service (httpd) and how to host the website with Apache.
If guys have any quires related to these tutorials then let me know in the comments.