


Ghost is a clean and lightweight platform designed for bloggers who want to focus on blogging and nothing else. Read how to Install Ghost Blog on Ubuntu 20.04 in.
Ghost Is An Open-source Blogging-Software Coded In Node.Js, Allowing You To Make Modern, Beautiful Blogs. Ghost Designed To Simplify Blogging Concept. It’s Written In Javascript And Uses Node.Js As Its Runtime Environment. Ghost Uses Markdown Syntax Within The Editor, So You’ll See How Your Blog Will Appear As If On A Live Site While You’re Writing The Blog. The Ghost Is An Ideal Platform For Bloggers Because It Is Extremely Clean And Light-weight.
Ghost Features
At The Time Of Composing, The Latest Version Of Ghost Is V3.22.1 Released On 01 July 2020. Features Of Ghost Are As Follows:
- A Nice-looking Default Theme Casper With Dark Mode Support.
- Simple Content Management.
- Collaborative Editing Together With Your Team.
- Scheduled Publishing
- A Markdown-based Editor Allowing You To Quickly Write Posts.
- Proper SEO Inbuilt Directly, Permalinks, Xml Sitemaps, With Semantic Markup, Canonical Tags, And Automatic Meta Data With Manual Overrides.
- Built-in Analytics
- Email Subscription Capture Forms, Full Rss Feeds, And Slack Webhook Integration
- Hundreds Of Beautiful Free And Premium Themes Are Available From The Ghost Marketplace
- Integrated Amp (Accelerated Mobile Pages) Support
- A Cross-platform Desktop App Is Available For Linux, Mac, And Windows.
Here We Will See How To Create A Self-hosted Ghost Blog On Ubuntu Server Because Ghost Foundation Offers Managed Hosting.
You Need To Have A Domain Name.
Before installing Ghost, it’s recommended that you simply create the DNS A record for your blog name. The A record points your name to the IP address of your Ubuntu server. if domains are not pointed to the server you will face issues while installing an SSL certificate.
I Installed Ghost With A Sudo User On Ubuntu. For Best Results, You Should Also Follow This Tutorial With A Sudo User, Not Root. To Add A Sudo User, Simply Run
Create a sudo user for Install Ghost Blog on Ubuntu
I am using blogger as a username you can change it if you won’t use another name.
sudo adduser blogger
sudo adduser blogger sudo
Then Switch To The New User.
su - blogger
Update Ubuntu
If Your Server Hasn’t Been Updated For A Few Time, Then Run The Subsequent Command To Update Existing Software Packages.
sudo apt update
sudo apt upgrade
Install NPM and Node.Js On Ubuntu
Ghost Requires Node.Js Version Below V12.X so we are going to use setup_12.x as v14 is not supported yet though the newest version is setup_14.x.
curl -sL https://deb.nodesource.com/setup_12.x | sudo -E bash -
Then Install Node.Js.
sudo apt-get install -y nodejs
Check Node And NPM Version.
node --version && npm --version
Sample Output:
v12.18.3
6.14.6
Install MariaDB Database Server
Supports Mysql And Mariadb. We are going to install MariaDB Now.
sudo apt install mariadb-server mariadb-client
Use Systemctl To Check Its Status, After It’s Installed, Mariadb Server Should Be Automatically Stared.
systemctl status mariadb
Sample Output:
● mariadb.service - MariaDB 10.3.22 database server
     Loaded: loaded (/lib/systemd/system/mariadb.service; enabled; vendor preset: enabled)
     Active: active (running) since Wed 2020-08-04 11:40:49 UTC; 11s ago
       Docs: man:mysqld(8)
             https://mariadb.com/kb/en/library/systemd/
   Main PID: 34484 (mysqld)
     Status: "Taking your SQL requests now..."
      Tasks: 31 (limit: 1137)
     Memory: 65.7M
     CGroup: /system.slice/mariadb.service
             └─34484 /usr/sbin/mysqld
If It’s Not Running, Use Below Command To Start:
sudo systemctl start mariadb
To Enable MariaDB To Automatically Start When System Boots, Run Below Command
sudo systemctl enable mariadb
Start The Post Installation Security Script.
sudo mysql_secure_installation
Complete the setup post-installation setup wizard.
When It Asks You To Enter Mariadb Root Password, Press Enter Key Because The Root Password Isn’t Set Yet. Then Enter Y To Line The Basis Password For Mariadb Server.
Check MariaDB Version.
mysql -V
Output:
mysql Ver 15.1 Distrib 10.3.22-MariaDB, for debian-linux-gnu (x86_64) using readline 5.2
Create a Database and User
Now login to the MariaDB console you will be logged in without a password as Ubuntu uses unix_socket to verify user login, So you’ll run the subsequent command to login without providing MariaDB root password.
sudo mysql
Create a database for Ghost using the subsequent command (Don’t skip the semicolon.)
create database ghost;
Then enter the command below to make a database user for Ghost and grant all privileges of the ghost database to the user.
Choose a secure username and password. Update in the below query as per your choice.
grant all privileges on ghost.* to db_user@localhost identified by 'db_pass';
Flush the privileges table for the changes to require effect then get out of the MariaDB console.
flush privileges;
exit;
Install Nginx Web Server
Ghost will use Nginx as a web server, so we need to run the below commands to install and allow the ports in the firewall.
sudo apt install nginx
Run the following commands to allow the ports in UFW firewall if it’s installed and implemented.
sudo ufw allow 80/tcp
sudo ufw allow 443/tcp
Install Ghost
Install Ghost-CLI.
sudo npm install ghost-cli@latest -g
Then create a directory (/var/www/ghost/) for Ghost.
sudo mkdir -p /var/www/ghost/
Grant permissions to the directory with already creating a user account. change blogger in command with your chosen username earlier if you use another name.
sudo chown -R blogger:blogger /var/www/ghost/
sudo chmod 775 /var/www/ghost
Go to /var/www/ghost/ directory and start ghost installation process.
cd /var/www/ghost/
ghost install
The installation process may take a while. During the installation process, you will be prompted to enter your blog URL and other information. Enter something like https://mydomain.com. And you will need to enter the MariaDB database name, user credentials you created before.
? Enter your blog URL: https://mydomain.com
? Enter your MySQL hostname: localhost
? Enter your MySQL username: db_user
? Enter your MySQL password: db_pass
? Enter your Ghost database name: ghost
✔ Configuring Ghost
✔ Setting up instance

✔ Setting up "ghost" system user
ℹ Setting up "ghost" mysql user [skipped]
? Do you wish to set up Nginx? Yes
? Do you wish to set up SSL? yes
? Enter your email (For SSL Certificate) [email protected]
? Do you wish to set up Systemd? yes
? Do you want to start Ghost? yes
A ghost system user is going to be automatically created. It’s recommended that you simply accept to set up Nginx and SSL, so your blog is going to be available via the secure HTTPS protocol. Also, accept to line up the Systemd service so you’ll be ready to start, stop or restart Ghost easily.
Once Ghost was installed successfully, visit https://mydomain.com/ghost to finish the setup. First, you need to make an account.
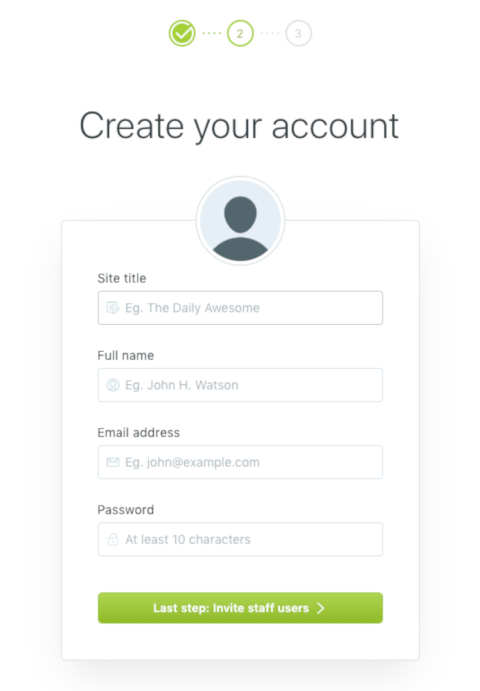
- On the welcome page, click Create your account.

2. Fill in the details in the below form.
3. Invite your team members.

Restarting Ghost
You can restart the Ghost instance after making any custom changes with the below command.
sudo systemctl restart ghost_mydomain-com.service
ghost instance restart command
Conclusion
In this post, You have learned how to install ghost blog CMS on Ubuntu. Leave your thoughts or queries in the comment section.


